You can customise certain aspects of CareFor to suit your company. You can do this under the "App Settings" tab, found under the "Settings" menu
Company Logo - here you can upload the logo for your company. It must be less than 2MB in size. Once uploaded, this will then appear in the top left of CareFor, and also appear on care plans, invoices and staff ID cards.
Company Information
- Company Name: - This is your company name - if you are a franchise then put the franchisee name.
- Company Address: - This is the address for the office. If a large company then it is Head Office.
- Telephone: - This is your office number, or the number you would circulate to your clients.
- Telephone (Out Of Hours): - Your out of hours number.
- Company Email Address: - Your Company email address where basic correspondence would go to.
- Company Registration: - Your Registered Company number as registered by Company House. (Only required for Limited companies.)
- CQC Reference - This is your individual CQC Reference that you have been given by the Care Quality Commission.:
- Charity Number: - If your company is a charity, enter the registration number here.
- Client Schedule Addendum - Information added into this box will display on the last page of the generated PDF of the client schedule
- Staff Schedule Addendum - Information added into this box will display on the last page of the generated PDF of the staff schedule
System Settings
- Rota Template: - This denotes the layout of rotas - Condensed, Continuous and Day Per Page. Condensed is recommended as it uses less paper to print.
- Year Start: - This denotes when the new year starts and when holiday is renewed. You may have it to match the calendar year (January - December) or maybe you will have it to match the financial year (April - March).
- Week Start Day: - This denotes what day your rotas start on in the week. (E.g. Monday - Sunday or Sunday - Saturday.)
- Deleted Notes: - You can choose how you would like deleted notes to show on CareFor, either with a strike through or hidden.
- Show Service User Address: - This option will allow you to print the Service Users address on the rotas for new carers who do not know where they are going. Please note - activating this will make it active for ALL rotas.
- Daytime Hours: - This is the window of time where you pay day time rates. Anything outside of this window of time will automatically default to evening rates.
- Assignments Print Type: - This should be left as "Standard"
- Send Daily Schedule: - If yes is selected, a PDF of the following day's schedule will be sent to the company email address each day around midnight. We strongly suggest that you have this sent to you. If you are accessing the settings and cannot see Send Daily Schedule as an option, please ensure you have entered an address in the Company Email field
Invoice/Charge Settings
- VAT Registration: - If you are VAT registered, the number belongs in this box.
- VAT Rate: (Percent) - The VAT you charge, this will always be current national VAT levels. (e.g. 20%)
- Payment Timespan: (days) - This is where you denote how many day a client has to pay your invoices from the date it is sent.
- Payment Info: - Use this box to relay any messages meant for a payer such as "Please make cheques payable to" or Account details so client can transfer payments.
- Reconcile on Invoice: - Do you want assignments to be automatically reconciled on invoicing?
- Edit Times on Invoice Assignments: - Do you want assignments to have their actual times modified even after they have been invoiced?
- Minimum Charging Units: - This is blocks of time that you charge in. For example, if it was set to 5 minutes and a visit lasted for 32 minutes, it would be rounded up and charged for 35 minutes.
- Charge Rounding Policy: - When rounding charges for your clients, do you round up or to the nearest charging unit?
- Minimum Charge: - This is the minimum amount of time that you would charge for. E.g. 15 mins for a quarter of an hour or 30 mins for half an hour, if either of those are your shortest visits.
- Client Mileage Rate: - This is the rate in pence that you CHARGE service users mileage (per mile).
- Charging Structure: - Do you charge a fee for a Service User to book visits?
Payroll Settings
- Staff Pay Capping: - How are your staff paid with respect to the actual times recorded.
- Minimum Pay: - This is the minimum amount of time that you would pay your carers for. E.g. 15 mins for a quarter of an hour or 30 mins for half an hour if either of those are your shortest visits.
- Time Between Bookings: - This denotes how much time is acceptable before you withdraw mileage to the next block of calls. (For example, if a carer has calls from 9am - 1pm then does not have any calls until 6pm, would you pay mileage to the carer to go to their 6pm visit after a 5 hour gap? This option means if more than the time in the box passes, it will remove the mileage to go to the first call of the second block. Please note, if you don't pay carers mileage for the first visit of the day then that is amended in Payroll not in App Settings.
- Do you pay staff travel ? : - This relates to "Travel Time" NOT Mileage. If you don't pay carers travel time then this should be set to no. If yes, then adjustments to the times are made in the Payroll.
- Default Travel Type: - Assignments will default to this using this travel type unless a member of staff has a preferred travel type set. This can be set individually within the carers profile.
- Pay travel between shifts - If you pay your carers travel from their home to the first visit (and from last visit to home), whether in time or number of miles, you can set this here.

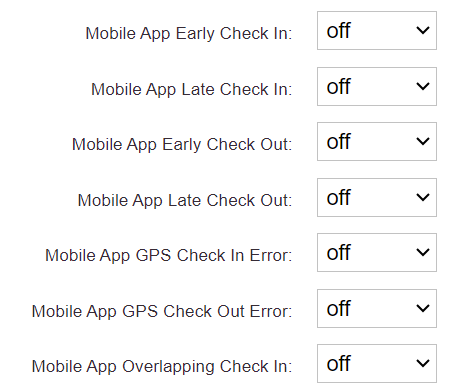
Call Monitoring Settings
- Late Check In Notification: When switched to on, if the carer checks in after the time you set, it will send a late notification to you.
- Late Check In After: This is where you set the time that is deemed as late.
- Late Check Out Notification: When switched to on, if the carer checks out after the time you set, it will send a late notification to you.
- Late Check Out After: This is where you set the time that is deemed as late.
For the rest of the settings under the Call Monitoring tab, you have three options - Off, Warning and Strict.
- Off - the setting will not be used for your system
- Warning - carers will be warned if there is an issue
- Strict - carers will be blocked from checking in